S-Chess Endings 2

In one way the seed to Seirawan Chess was born in the hot and heady blitz crowds of Manhattan. I don't recall the actual year I think it was in the early eighties that while visiting the Big Apple to play in Jose Cuchi's celebrated New York Open events I'd stay a few days before and after the event in order to better enjoy the excellent Indian culinary delights on the lower East side as well as to share time with my New York friends. Often I'd visit the Marshall and Manhattan Chess Clubs as well as Washington Square Park.
In the park I'd find, Livermore, an African American with a lively patter designed to lure in the customers for money blitz games. In no time Livermore realized I was not going to be a client. At least of his. His idea of "evening up the odds," was not for me to give him a time handicap rather he preferred a material handicap. He wanted to play with a, "Jester." This was a taped Bishop which he would nominate before the game; usually his King's Bishop and it would have the power of our Hawk. Needless to say, I went after this piece with a vengeance and would happily sacrifice a Rook for it. Livermore was disheartened when his Jester was captured and I was charmed by its remarkable powers, sadly, I was never allowed to wield a Jester myself. I remember some of our games, which weren't bad as he was a master player. I'm especially grateful for the name change to the Hawk it is not much fun to lose to a move by a piece called a Jester.
For our first diagram, the Hawk takes on a Queen:
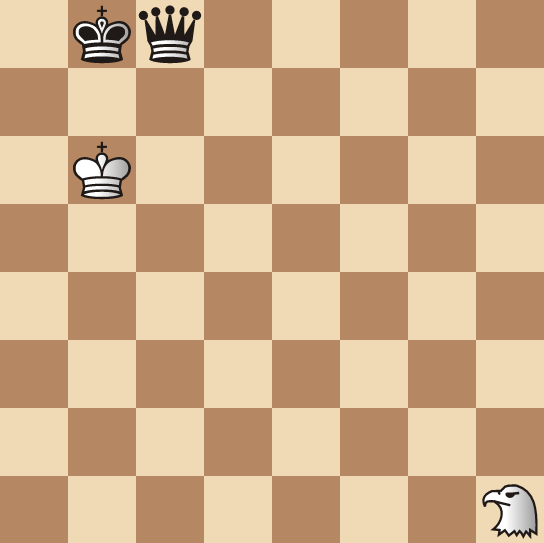
White to move and win
White's King occupies the ideal square in such circumstances. We start with a pattern that will become second nature in no time: 1.Hg3+ Ka8 2.He4+ Kb8 3.Hd6+, this series of ladder checks, has brought the Hawk into the vicinity of Black's Queen. After the further moves: 3…Ka8 4.Hxc8 Kb8 5.Ha7+ Ka8 6.Hc6 checkmate. Our final position is our Hawk Mate. White's King is not needed.
This series of ladder checks is quite typical for a Queen. If we replace the White Hawk with a White Queen in our diagram and also place a White pawn on the a5-square, White wins by: 1.Qh2+ Ka8 2.Qg2+ (without the White a5-pawn, White would win with 2.Qa2+ and Qa7 mate) 2…Kb8 3.Qg3+ Ka8 4.Qf3+ Ka8 5.Qf4+ Ka8 6.Qe4+ Kb8 7.Qe7! a quiet move that wins.
Let us investigate how the Hawk fares dueling a Rook. If from the diagrammed position we replace Black's Queen with a Black Rook, the win is the same.
This series of ladder checks were tailor made for the Hawk. However, if we "misplace" the Hawk on the g2-square from the start, we come to my first Hawk Study in our next diagram:
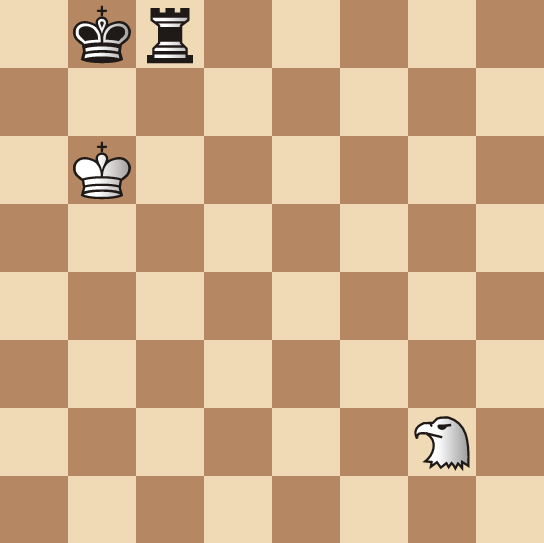
Hawk Study Seirawan 2007
White to play and win
The first thing we discover is that the series of ladder checks after: 1.Hf4+ Ka8 2.Hd5+ Kb8, yields nothing and the Hawk's clutches are empty. A different approach is needed. White needs, to "reposition" the Hawk into the correct pattern and to lose a tempo.
1.Hb7!!, A marvelous move as White tries to lose a tempo to reposition his Hawk. Black is forced to keep his Rook on the c-file: 1…Rc1!, the best move. If, 1…Rh8?? 2.Ha6+! Ka8 3.Hc7 Checkmate. An important motif worth searing into our brains. Other moves by the Rook along the c-file allow the Hawk to fill its clutches: 1…Rc4? 2.Hd6+ wins; 1…Rc3? 2.Hd6+ Ka8 3.He4+ wins; 1…Rc2? 2.Hd6+ Ka8 3.He4+ wins. With Black's Rook forced away, the Hawk is repositioned with tempo: 2.Hd6+! Ka8 3.He4+ Kb8 4.Hd3!! Brings us to our next diagram:
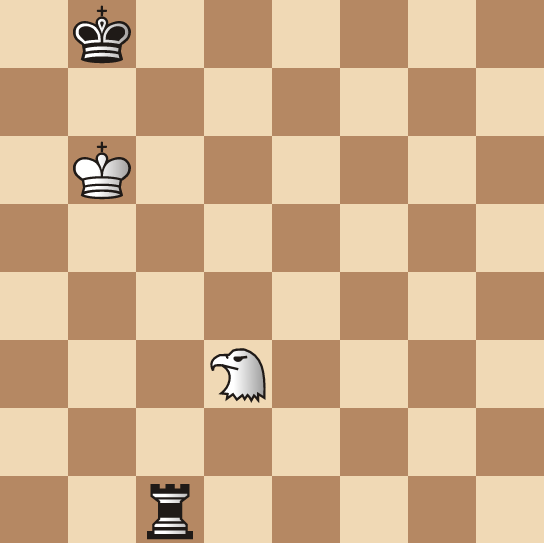
White threatens Black's Rook while also threatening an invasion on the a6-square. Black's Rook cannot guard against all the threats: 4…Ra1, Black has no checks. If his c1-rook moves along the back rank, 4…Rg1, then 5.Ha6+ Ka8 6.Hc7 checkmate while 4…Rc8 5.Ha6+ snares the Rook. Now the Hawk struts its stuff by: 5.He5+ and 6.Hxa1, winning.
In passing, I would note that this study would not succeed on a 10 x 10 board. The Rook would move two more squares down the c-file placing it out of reach from the Hawk.
As we have seen with the Elephant, while it is desirable to drive the defending King into a corner, it isn't always necessary. Let us move on to our next diagram:
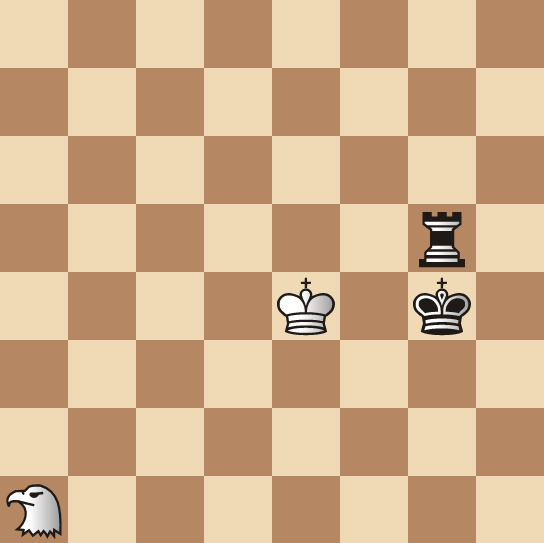
White to move and win
1.Hf6+ Kg4 2.Kf3, winning the Rook.
Again, a tailor made operation. It seems whenever a Rook is forced into an absolute pin by a Hawk the Rook is lost as we see in our next diagram:
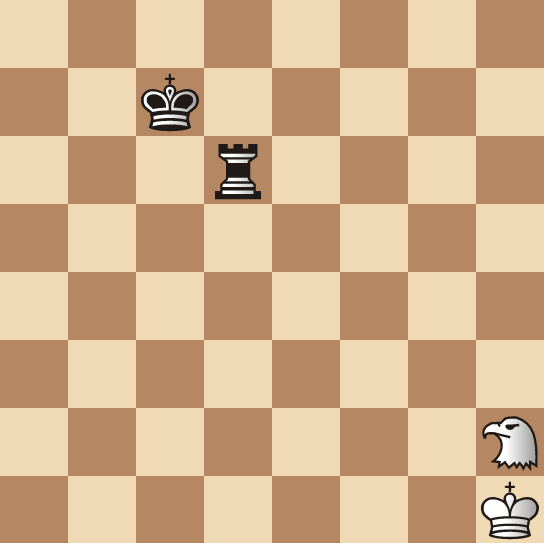
White to move and win
The win is child's play: 1.He5!, Black's King must give up protection of the Rook and it is lost. The question is can White force these types of winning positions from say a normal starting position of Hawk versus Rook? Clearly, if the defending King is driven to the edge of the board or to the corners a win is likely, but can it be forced?
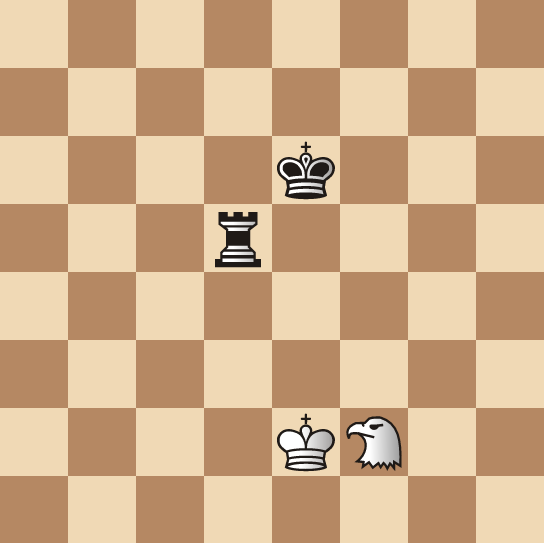
Win or Draw?
Let us say it doesn't really matter who is to play. Hence: 1.(Ke3) Re5+ 2.Kd4 Rd5+ 3.Kc4, White's King marches smartly up the board with the intention of bullying Black's King backwards. Black has to be alert and not to allow the pin, 3…Rf5?? 4.Hg4 wins. The same is true for, 3…Rh5?? 4.Hg4+ forcing Black into a pin. In view of these lines we will try to keep Black's Rook out of danger and to limit the advance of White's King: 3…Ra5, seems reasonable. Now let us toss out, 4.Hd4+, just asking Black where he wants to go with his King. While there are a few squares that are landmines like the e7-square, I find it hard to make progress after say: 4…Kd6 5.Hb6 Rh5 6.Hc8+ Kc7 7.He6+ Kb6 8.Hd8+ Ka6, Black's King has been displaced to the edges of the board.
But how to make further progress? In my mind's eye it would be nice to deliver a check on the c8-square at this very moment (an illegal move). This would force Black's King to the a5-square. In that position another check on the c7-square (another illegal move) would drive Black's King "into contact" with White's and I can imagine something good exists there. But how to get the Hawk to the c8-square? A repositioning by: 9.Hc7+ Kb7 10.Hd6+ Kb6 doesn't achieve much. Now would probably be a good time to reposition the Hawk with a quiet move although I'm not sure of how quiet such a move might be. The move I find attractive is: 9.Hf6, tickling Black's Rook. If we see: 9…Rf5? 10.Hd7 Rf4+? 11.Kc5, and White has suddenly made great progress.
The question is how to meet, 9…Rh1, when it feels as if White can torture his opponent for awhile but can't really force Black's Rook and King backwards. Okay, a table-base will be needed to show a forced win or a forced draw but the fact that the Rook can put up such a defense suggests that the Hawk has a lesser value then the Elephant in such situations, as well as to the Queen.
We know that passers on the seventh rank can cause problems for the Queen whereas the Elephant has no trouble against a passer. How about the Hawk? Give the matter some thought before reading on…
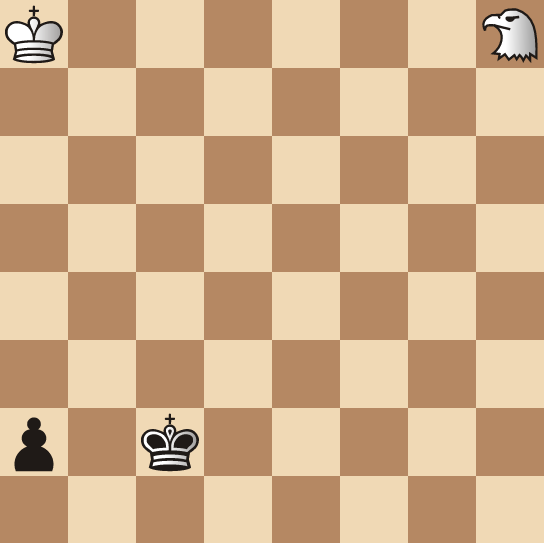
White wins
I see no trouble for the Hawk. For instance in our diagram, as the Hawk already controls the promotion square, the win is simple: 1.Ha1+ (Not exactly needed but the Hawk plops itself in front of the passer, the principle idea.) 1…Kb1 2.Hc3+, forking King and pawn.
This ability of the Hawk to win against any passer on the 7th rank makes it far superior to a Rook and as we know, in the cases of a, c, f or h-pawns, superior to a Queen.
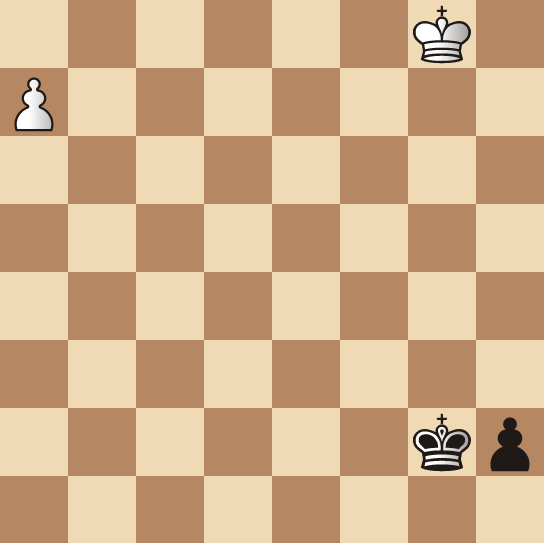
Seirawan 2007
Hawk Study
White to move and win
Readers score no points for playing: 1.a8=H+!, the only winning move. Those who wanted to Queen the pawn are encouraged to consider checkers as an alternate interest.
Let us see how the Hawk might fare in some normal appearing circumstances:
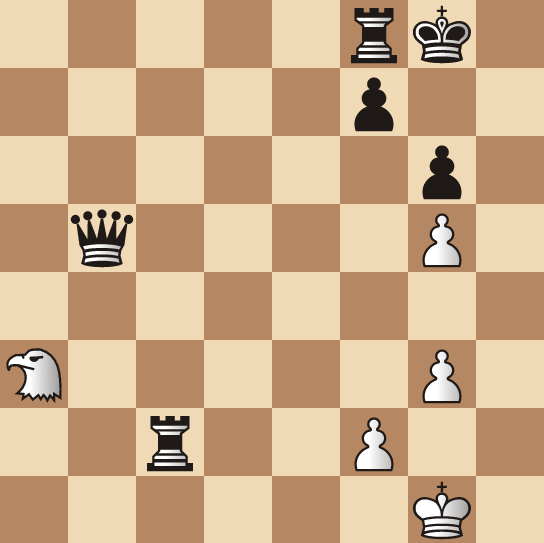
White to move and win
Clearly White is behind gobs of material and he should capture as much as possible to catch up. Would you grab the b5-Queen, the c2-Rook or play something else?
If you wanted to take the Queen, kudos to you! Being a materialist in chess is quite important. If you recognized that White has a mating pattern with the Hawk, better still! The best is: 1.He7+ Kg7 2.Hf6 checkmate.
What is so exciting about the Hawk is not how it fares in endings but how it can combine with other pieces in a mating attack. I was inspired by a game from a simultaneous by FM John Yoos to create the following:
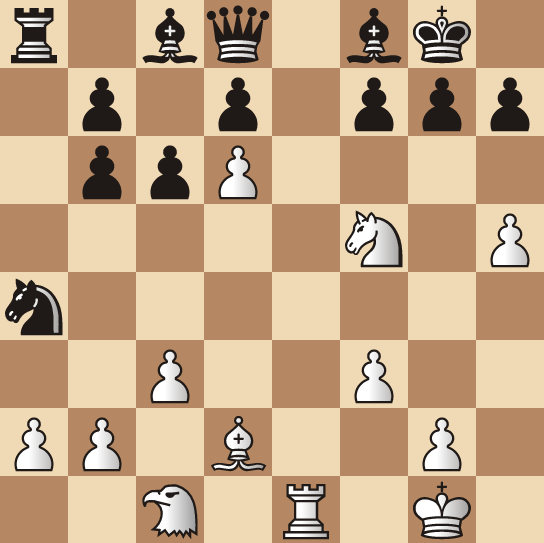
White to move and win
In our diagram, from a material point of view, Black isn't doing badly at all, with Bishop and Queen versus Hawk. The problem is that Black's Bishops are hemmed in and both Black's King and Queen are vulnerable. White begins with the obvious attacking move: 1.Bg5!, when Black is in a world of trouble. Let us enjoy answering the following questions:
1) How would you meet: 1…f6?
2) If Black chooses to capture the Bishop with, 1…Qxg5 2.Hxg5 f6, how would you continue the attack?
3) If Black chooses to capture the Bishop with, 1…Qxg5 2.Hxg5 Nc5, how would you continue the attack?
4) If Black tries to defend by: 1…Nc5 2.Bxd8 Ne6, blocking the e-file, how would you continue?
My solutions to these questions would be as follows: Perhaps you came up with better answers?
1) 1…f6? 2.Hb3+! Kg8 3.Hf7 Checkmate.
2) 1…Qxg5 2.Hxg5 f6 3.Nh6+! gxh6 (3…Kh8 4.Hf7 mate) 4.Hxf6+ Kf7 5.He8+ Kg8 6.Re7 (Threatening 7.Hf6 mate.) Bxe7 7.dxe7 d5 8.Hf6+ Kf7 9.e8=H+! Ke6 (9…Kf8 10.Hd6 mate.) 10.Hd8+ Ke5 (10…Kf5 11.Hd6 checkmate) 11.Hdc7+ Kf5 12.Hcd6+ Kg5 13.Hdf7+ Kf5 14.Hg7+ Kf4 15.Hfxh6+ Kg3 16.He5+ Kh4 17.g3+ Kxh5 18.Hhf4 Checkmate.
3) 1…Qxg5 2.Hxg5 Nc5, allows White's Rook to invade: 3.Re8 Ne6 4.Nh6+! Kh8 (4…gxh6 5.Hf6 checkmate) 5.Hxf7 Checkmate.
4) 1…Nc5 2.Bxd8 Ne6 3.Ne7+ Kg8 (Capturing the Knight with: 3…Bxe7 4.dxe7 brings no relief.) 4.Rxe6 dxe6 5.Hg5 (Threatening, 6.Hxf7 mate) g6 (Otherwise, 5…h6 6.Hxf7+ Kh7 7.Hg6 checkmate.) 6.Hxf7+ Kg7 7.He5+ Kh6 8.Ng8+ Kxh5, and White has a choice of four different mates with his Hawk! Can you spot them all?
Co-inventor Bruce Harper has a chess student, Tiffany Tang, who opined that a Hawk is like three minor pieces, two Bishops and a Knight in one. An insightful comment! And as this diagrammed position showed a Hawk works marvelously with other pieces to coordinate a checkmating attack.
We know if a player promotes to an Elephant and has two on the board at once we would have, Hannibal's Rampage. Readers are invited to describe a position where a player has two Hawks.