S-Chess Endings 3

In orthodox chess it is well known that a Knight is a terrific blockader against the passed pawn whereas the Queen finds it to be beneath her dignity to perform such a role. A Rook can be clumsy and in the case of connected passed pawns a Bishop might be chased away. All of which raises the question of how a Hawk might perform when blockading passed pawns? The answer, for me, is crystal clear: Very well indeed! Acting as both Knight, a great blockader, as well as a Bishop striking along a diagonal means that the Hawk can blockade and attack with relish. The following diagrammed position is the kind of example that I have in mind:
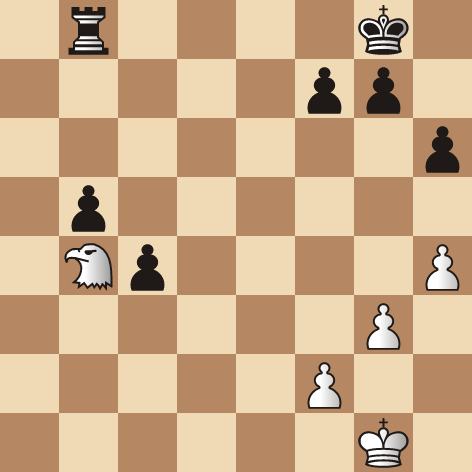
White to move
From the diagrammed position we see that from a material point of view Rook (5) and two connected passed pawns (2) versus a Hawk gives the appearance that a good battle lies ahead. Actually it is a pretty one sided affair in favor of the Hawk! In the first place Black's pawns are firmly blockaded yet White's Hawk can do wonders attacking as well as keeping an eye on the passers: 1.He7+ Kh7 2.Hd6, hitting the Rook as well as the b5 and f7-pawns. Black cannot play: 2…c3? 3.Hxb8 c2 4.Hf4 as the Hawk zooms back to stop the passers. Neither can Black afford the loss of the b5-pawn by: 2…Ra8 3.Hxb5 as the c4-pawn goes next. Black's best is to soldier onwards keeping both passers: 2…Rb6 3.Hxf7!, challenging Black to advance his pawns and to use his trumps. Clearly, 3…b4? 4.Hxc4, is a mistake.
More intriguing is: 3…c3 4.Hd5, forking the b6-Rook and the c3-pawn. The c-pawn can't advance as: 4…c2 5.He4+, picks up the c2-pawn. If, 4…b4 5.Hxb6 c2 6.He3 b3 7.Hc1 and both passers will be quickly captured. Black puts his faith in his b-pawn: 4…Rb8 5.Hxc3 b4 6.He4+!, White intends to block the b-pawn from the b3-square and Black tries to avoid that from happening: 6…Kh8, as 6…Kg8 7.Hd5+ Kh8 8.Hb3, is what White wants to achieve. White takes a stab: 7.Hg6+ Kg8 8.Ee7+ Kh8!, Black avoids, 8…Kf7?? 9.Hd6+, winning the Rook. White decides that blocking on the b2-square isn't so bad after all: 9.Hg6+, White should not win the Rook as: 9.Hd6 b3 10.Hxb8 b2 and the Hawk can't stop the b-pawn from promoting, 9…Kg8 10.He5 b3 11.Hb2!, brings us to our next diagrammed position:
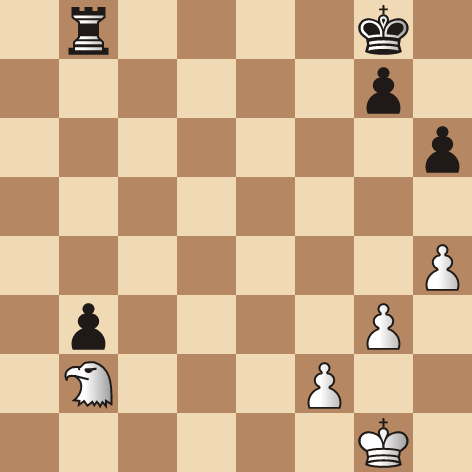
As we see, Black has at the cost of two pawns managed to advance his b-pawn two squares but has no further benefit to show. The b-pawn is still firmly blockaded and White can plan to bring his King to the b1-square and then release his Hawk against Black's King. Black is helpless to stop this plan. If the Rook leaves the protection of the b3-pawn, it can be attacked by either Hb2-a4 or Hb2-c4. Another winning idea for White would be to advance on the Kingside and support the advancing pawns with the King, letting the Hawk remain where it is, blockading the b-pawn. Let us imagine that Black tries: 11…Rc8 12.Kg2 Rc2, trying to break the blockade, 13.Ha4!, wins the b-pawn. Clearly, the Hawk is an amazing blockader!
When it comes to supporting a passer, the Hawk is also impressive. In the diagrammed position, the Rooks play a clumsy role.
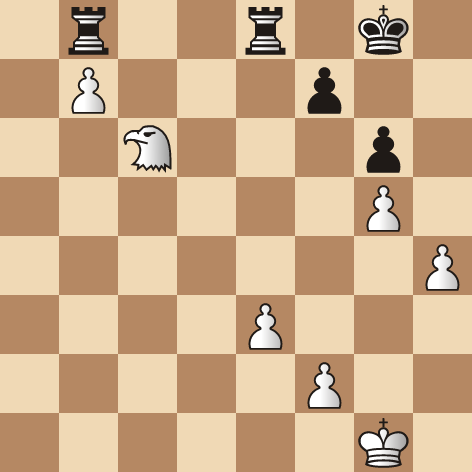
As we see from the diagram, Black's Rooks are stuck. The weakness of the f6-square means that Black is vulnerable to a Hawk Mate. The e8-Rook has to keep guard over his b8-colleague and can't leave the back rank. Black is helpless against White's straight-forward plan of advancing his King and pawns: 1.e4 Kg7 2.e5, while it wasn't clear that Black would play …f7-f6 exposing his King, this option is now ruled out. Black can only mark time: 2…Rbd8 3.Kg3 Rh8 4.Kg4 Rhe8 5.f4 Rh8 6.f5, White simply continues his pawn march, 6…gxf5+ 7.Kxf5 Rhe8 8.h5 Kg8, this is not a voluntary retreat.
Black can't be caught with his Rook in the corner. If, 8…Rh8 9.h6+ Kh7 10.He4!, with the fatal He4-f6+ to follow. White continues his advance: 9.h6 Rb8, the alternative, 9…Kf8 10.e6 fxe6+ 11.Kf6 e5 12.Hxd8 Rxd8 13.h7, wouldn't help. White can now win with a similar break-through by 10.e6 fxe6+ 11.Kf6 Rf8+ 12.Kg6 winning. However, he also has a simple redeployment: 10.Hd7!, the Hawk heads to the favorite f6-square and the h7-pawn promotes. White wins. The idea behind this example is that while the Hawk aided the passed b7-pawn keeping the Rooks pinned down it was also able to jump at the opportunity to go for a mating position as the defending King's shield was stripped away.
For our next diagram, the Hawk and passer takes on a Queen:
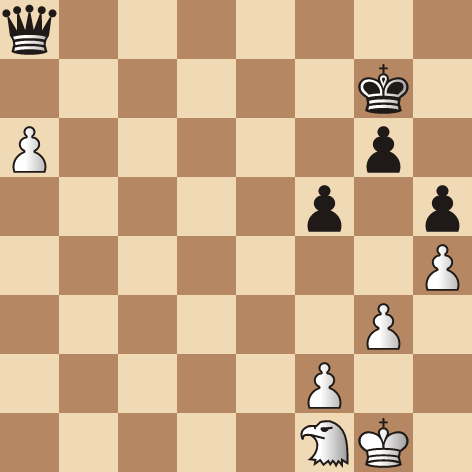
White to move
The Hawk takes advantage of its ability to protect the passer and to simultaneously support its advance: 1.Hb5!, White's first step is to prepare the advance of his passer. In this goal White is considerably aided by the fact that his King is well protected and not vulnerable to a perpetual check. Black plays: 1…Kh7, moving his King to a less vulnerable square. Note that, 1…Qd5?? 2.Hc3+, forks King and Queen. With, 2.a7, the passer advances. Now White intends to redeploy the Hawk to the b6-square. Black's best is likely to be, 2…Qb7, seeking to activate the Queen. The aggressive, 2…Qe4? 3.Hc7 Qb1+ 4.Kh2 Qc2 (4…Qb7 5.a8=H! or 5.a8=E!, both win.) 5.Hb6! Qc6 6.a8=H, wins as does, 6.a8=E, when both pieces mutually protect one another. 3.Hd4 Qa6, Black's Queen is much more active on this square instead of the blockading a8-square. 4.Hc5 Qa1+ 5.Kh2 Qa5, protecting the b6-square. Now it is awkward for White to make progress if the Hawk is forced to retreat.
Redeployment is needed and the Hawk goes after Black's King: 6.Hf8+! Kh8, an unfortunate necessity. If, 6…Kg8? 7.He7+ Kh7 8.Hc6! Qb6 9.e8=E! Qxc6 (9…Qxf2+ 10.Hg2 wins) 10.Ea7+ forks King and Queen. Now White picks up a Kingside pawn with check and continues his Hawk redeployment: 7.Hxg6+ Kg7, again, 6…Kg8? 7.He7+ and He7-c6 wins. White could now continue to capture pawns with check by: 8.Hxh5+, which would win but he has an immediate win with: 8.He8+! Kh7 9.Hc6! winning. Readers are invited to have a little fun playing through the sequence: 9…Qb6 10.a8=H (Stronger is 10.a8=E!) 10…Qxf2+ 11.Hg2, with a situation of a Queen versus two Hawks. It isn't a contest but see for yourself how the two Hawks beautifully coordinate together to win pawns, while protecting the King as well as one another.
While Black can, undoubtedly defend better, the moves of the main line were made to demonstrate the remarkable ability of the Hawk to support a passer while also being able to attack the defending King on the other side of the board. Such talent is worth keeping in mind.
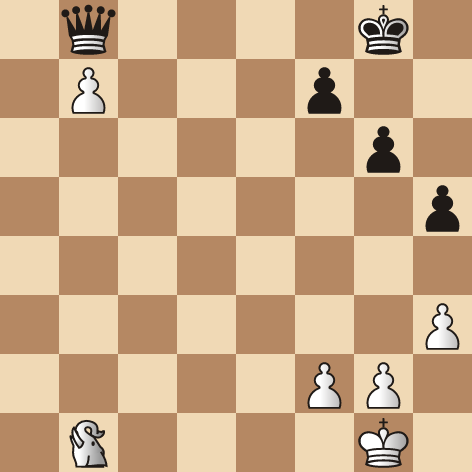
These examples of the Hawk doing marvelous things in terms of supporting a passer made me think about the Elephant in the same role. The following diagrammed position shows how an Elephant can stuff a passer forward:
White to move
The position is winning for White he has only to be careful about a possible perpetual check. If the Elephant was a Queen, White's winning plan would be straightforward, Qb1-b6-c6-c8 and pawn promotes to a Queen. Here the Elephant has to do its "own thing." White's play is also straightforward: 1.Eb6, with the threat of Eb6-c8+ winning on the spot. Black get's off the back-rank: 1…Kg7 2.Ed7!, doing what an Elephant does best, attacking as a Knight and defending as a Rook. Black's Queen is forced to move: 2…Qe8, is relatively best. If, 2…Qf4 hoping for a perpetual, 3.b8=Q!, covering the h2-diagonal is a winner. Now White has to promote or is that under-promote (?) to an Elephant: 3.b8=E Qe1+ 4.Kh2 Qxf2, Black has not given up on his hopes for a perpetual.
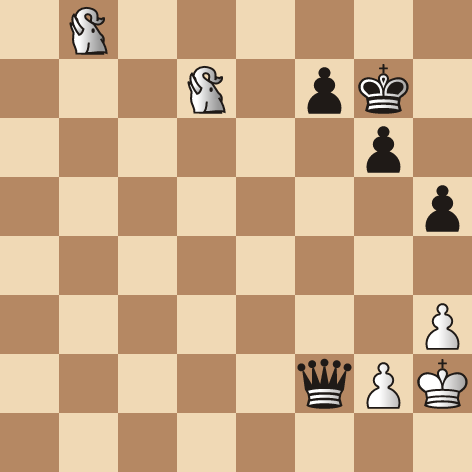
Take a quick look at the diagram and see how White can effectively end the game:
White to move
White starts by bringing his b8-Elephant into play: 5.Ee8+ Kh6, note that: 5…Kh7 6.Edf6+ or 6.Eef6+ are both winners. Now White has two fine choices he can play: 6.Eef6, covering the f4-square and setting up the impressive double threat of 7.Edxf7 as well as 7.Efxf7 checkmate, winning on the spot or he can continue with check by, 6.Eg8+, forcing Black's King to take a stroll, 6…Kg5, since 6…Kh7 7.Egf6+ wins Black's Queen. Play has brought us to our next diagram:
White to move
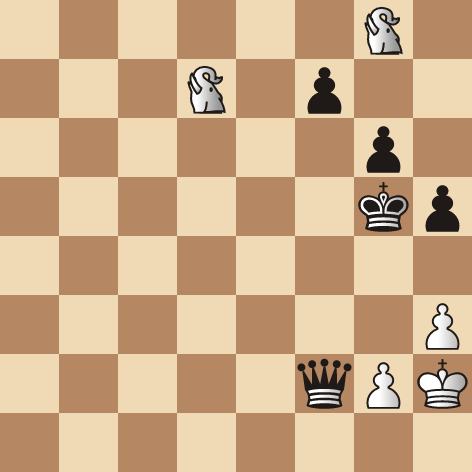
Before reading on take a careful look at the diagrammed position. How would you play?
White has the superb move: 7.Ee5+! Qf5, Black is forced to make this interposition as, 7…f5 8.Eexg6 mate as well as 8.Egxg6 mate. If, 7…Kh4 8.Egxg6+ and mate next move, while 7…Kf4 8.Exf7+ Ke3 9.Ee8+ wins. Although White has many wins, a pretty one occurs after: 8.h4+! Kf4, the h4-pawn is poison as: 8…Kxh4 9.Exf5+ gxf5 (9…Kg4 10.Egh6 checkmate) 10.g3 checkmate. Now White plays another attractive Elephant move: 9.Ef3+! Ke4, again 9…Kg4 10.Eh6 checkmate. Now White brings his second Elephant into play: 10.Ee8+ Qe6, what a spoiled sport. Leading to an immediate forced mate was: 10.Kd5 11.Ec3+! Kd4 12.Eee2 checkmate. Nice! After, 10…Qe6, White may capture the Queen and continue Ef3-g5+ to wipe out Black's pawns for an easy win. The fun question to contemplate is whether or not White should play for a checkmate with his two Elephants? A line that looks the most attractive would begin: 11.Eg5+ Ke3 12.Ed8, setting up for a mating net with Eg5-f3+. It is fun to see how Black might defend? If he tries: 12…Qg4 13.Edd5+ Kf2, otherwise, 13…Ke2 14.Ege5+ Kf2 15.Ed3+ Kf1 16.Eee1 checkmate. Now White plays: 14.Exf7+, Black is forced to play either 14…Ke2 or 14…Ke1 when 15.Efxe5+ leads to mate.
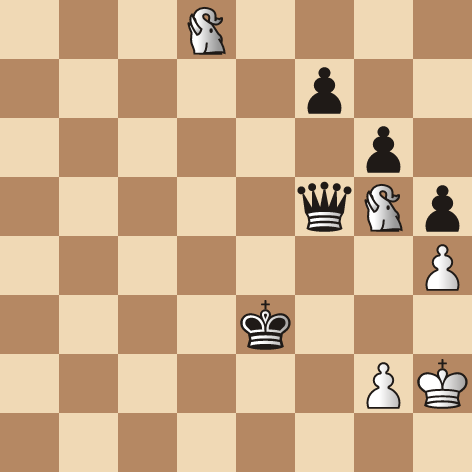
Leading to our next diagram, my question, dear reader is how would you play after 12…Qf5?
White to move
From these examples I hope you are inspired by how much fun it is to play with either two Hawks or two Elephants in a game. If you compose an endgame study featuring the two new pieces send it along for inspection! (yasser@seirawanchess.com ) Tactical puzzles are also most welcome.
PS: I would play: 13.Eg3+ a move that leads to a forced mate. The nice one being: 13…Kf2 14.Ed2+ Ke1 15.Ege2 mate.